The CLIL Wheel as a Teacher Training Tool
Aleksandra Zaparucha is a Geography and English teacher with over 30 years of experience in Geography and EFL teaching, teacher training, translating, examining and materials writing, including over 20 years of CLIL. For more information, check her CLIL Matters website at https://clilmatters.com/

The CLIL Wheel
An essential condition for a successful CLIL programme is teacher training, which should include strategies for effectively integrating content and language in everyday teaching practice. An efficient yet relatively simple tool CLIL practitioners may use is the CLIL Wheel (Zaparucha, 2019). It is based on the 4Cs of CLIL (Coyle et al., 2010): Culture, which forms the Wheel’s outer ring and Content, Communication and Cognition in the centre. These latter 3Cs are matched with the 10 CLIL Parameters (Ball et al., 2015): four related to Content and Communication each, one bridging Content and Communication, and one associated with Cognition. For teachers, the CLIL Wheel may provide lesson preparation support, while for trainers, a training backdrop. The following teacher training session shows the stages of working with 10 CLIL parameters.
The CLIL Wheel, CLIL Matters
Teacher training session materials
For this face-to-face training session, the following materials should be prepared:
-
the CLIL Wheel poster or slide for reference,
-
one set of 10 CLIL parameters, coloured or black-and-white, size B5 (Fig. 1),
-
one set of texts on 10 parameters (Fig. 2),
-
ten sheets of A3 paper,
-
glue sticks,
-
one colour marker for all groups (e.g., black) and another for each group,
-
handouts for note-taking (Fig. 3).
Teacher training session procedure
Stage 1: Preparing mini-posters
Pre-reading
After briefly introducing the CLIL Wheel, the participants are divided into five groups, the size of which depends on the number of participants (pairs or groups of 3 or 4 would work best). Each group gets two randomly distributed parameter visuals (Fig. 1), two A3 sheets of paper, a glue stick, markers, black for everyone and one other colour, different for each group.
The task for each group is to create two mini-posters related to their parameters, which answer the following questions:
-
What is this parameter about?
-
Why is it important?
-
How do we achieve it?
The groups are instructed to glue the visual representations of their parameters on the A3 paper and divide the remaining space into three areas of similar size with the headings WHAT?, WHY? and HOW? As a result of their discussions, groups put their ideas on the posters using the black markers and add their names.
While-reading
Groups receive copies of the texts related to their parameters (Fig. 2). While reading, they individually highlight ideas they think should be added to the mini-posters.
Post-reading
After a discussion, groups decide which ideas to add to their mini-posters, using the second marker colour to show their new understanding of the concepts presented by their parameter. As groups stick to their second colour, their authorship is clear if option 1 of the follow-up is selected. Figure 4 presents example mini-posters from a CLIL teacher training session.
Stage 2: Follow-up: teaching each other
To share all the information with the entire class, different options are possible. Option 1 involves passing posters to other groups to read and, possibly, add new info, comments or questions (every group uses their colour 2 markers). When the initial authors of posters get them back, they may add more information, answer questions or clarify ambiguities. Posters are then displayed in a gallery-style exhibition, and groups move around to read and discuss all posters. Finally, a whole-class discussion on the validity of the 10 parameters is held, including the participants’ reflections related to their context. At the end of the course, it would be advisable to go back to the same posters and reflect on them, especially the WHY? and HOW? parts.
Option 2 requires participants to work with the handout for note-taking (Fig. 3). Out of each group, two ‘experts’ sit at separate tables (10 altogether, one for each parameter), while others join ‘experts’ at other tables. All the ‘experts’ discuss their parameters with those who visit their table. Participants move around until they have notes about at least four different parameters. To ensure participants move swiftly from one table to another, the trainer might limit the time, for example, to 3 minutes. Returning to the initial groups, participants share their information and add notes to their worksheets. In the final stage, a similar discussion is held as described in option 1.
|
|
|
|
|
|
|
|
|
|
|
|
|
|
|

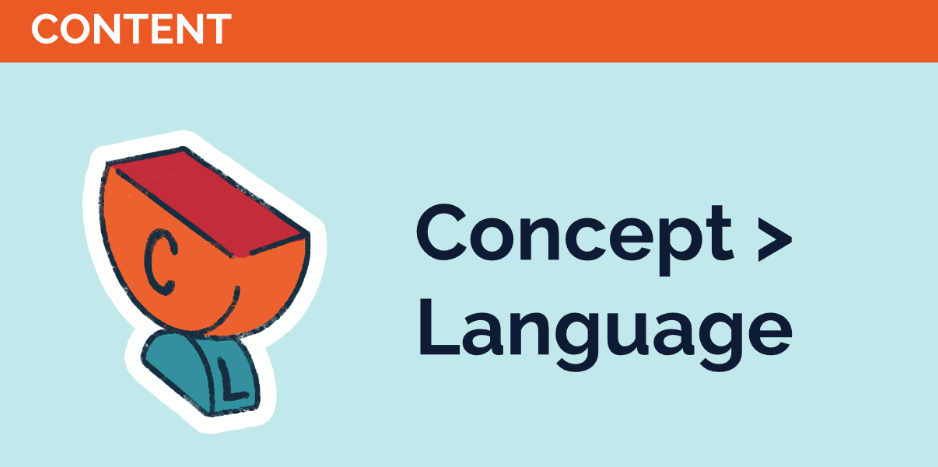
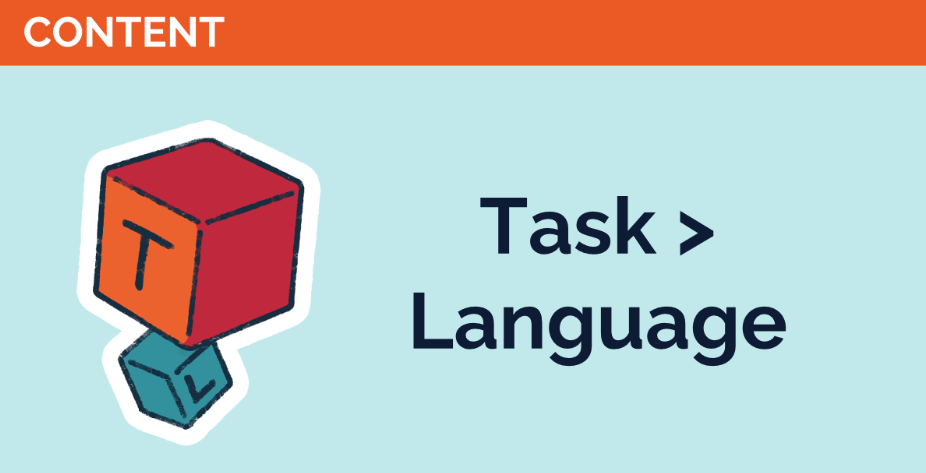
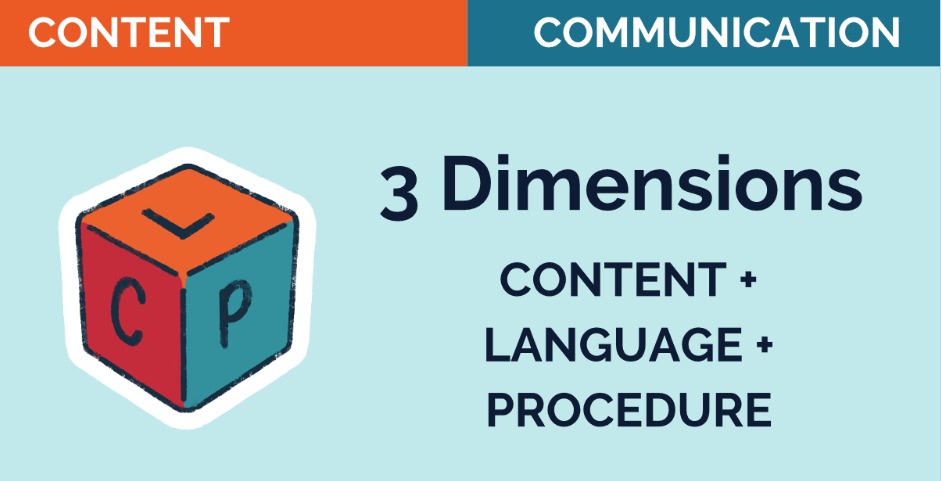

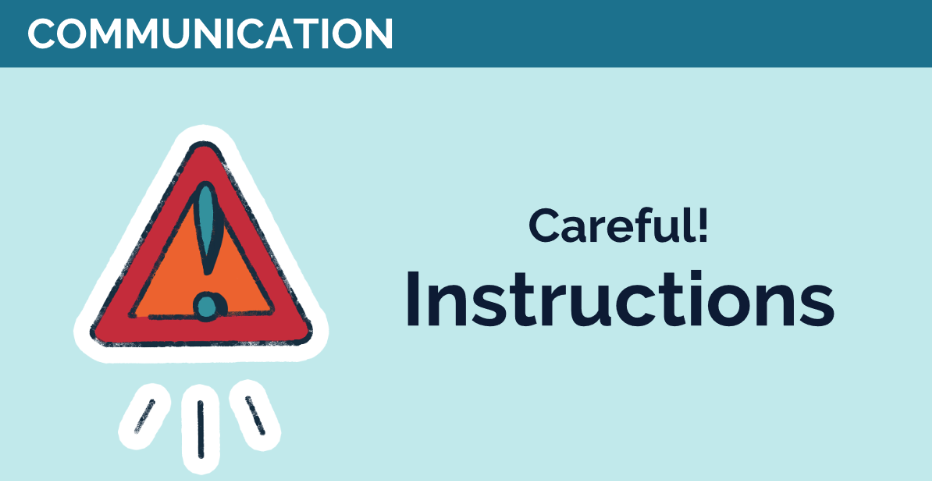

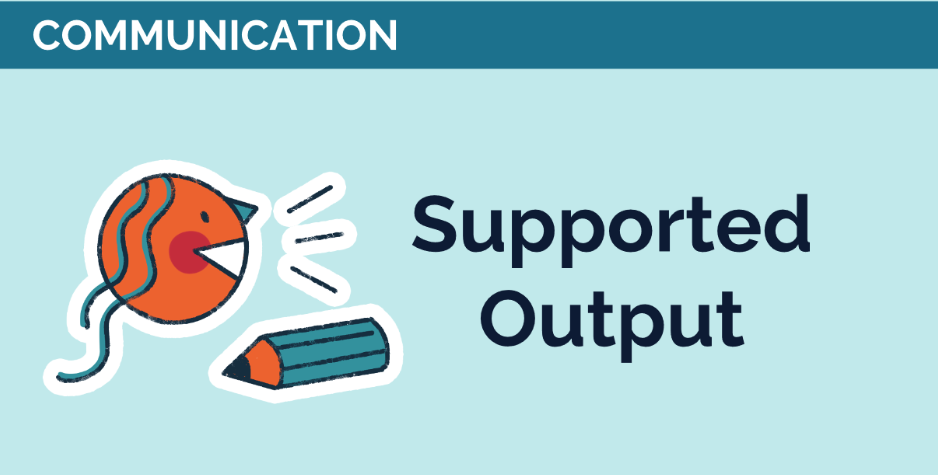
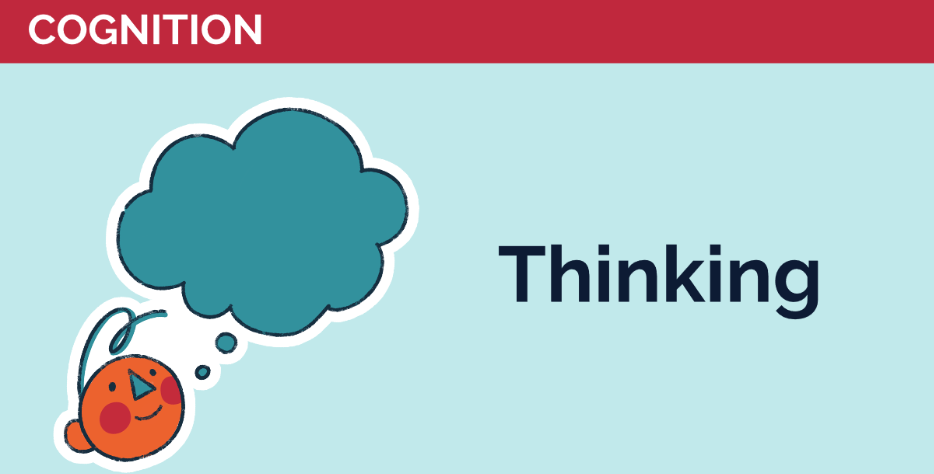
Fig. 1. Visuals of the 10 CLIL parameters for poster-making
|
1) 1-2-3 Sequence (Conceptual sequencing) Teaching all traditional school subjects, such as mathematics, science, history, and geography, follows a specific order or sequence. This ‘sequencing’ of concepts is helpful for learning. We know more or less where we have been and where we are going. Subject teachers working in CLIL have no particular problems with the idea of sequencing. Still, they must understand how the language of each unit progresses, repeats, recycles, and grows in complexity. No task in CLIL exists in isolation. There is always a ‘before’ and an ‘after’. For example, if the teacher introduces the topic ‘The discovery of the Americas by Columbus, ’ the students may have heard the term ‘discovery’ and know what ‘the Americas’ is. |
|
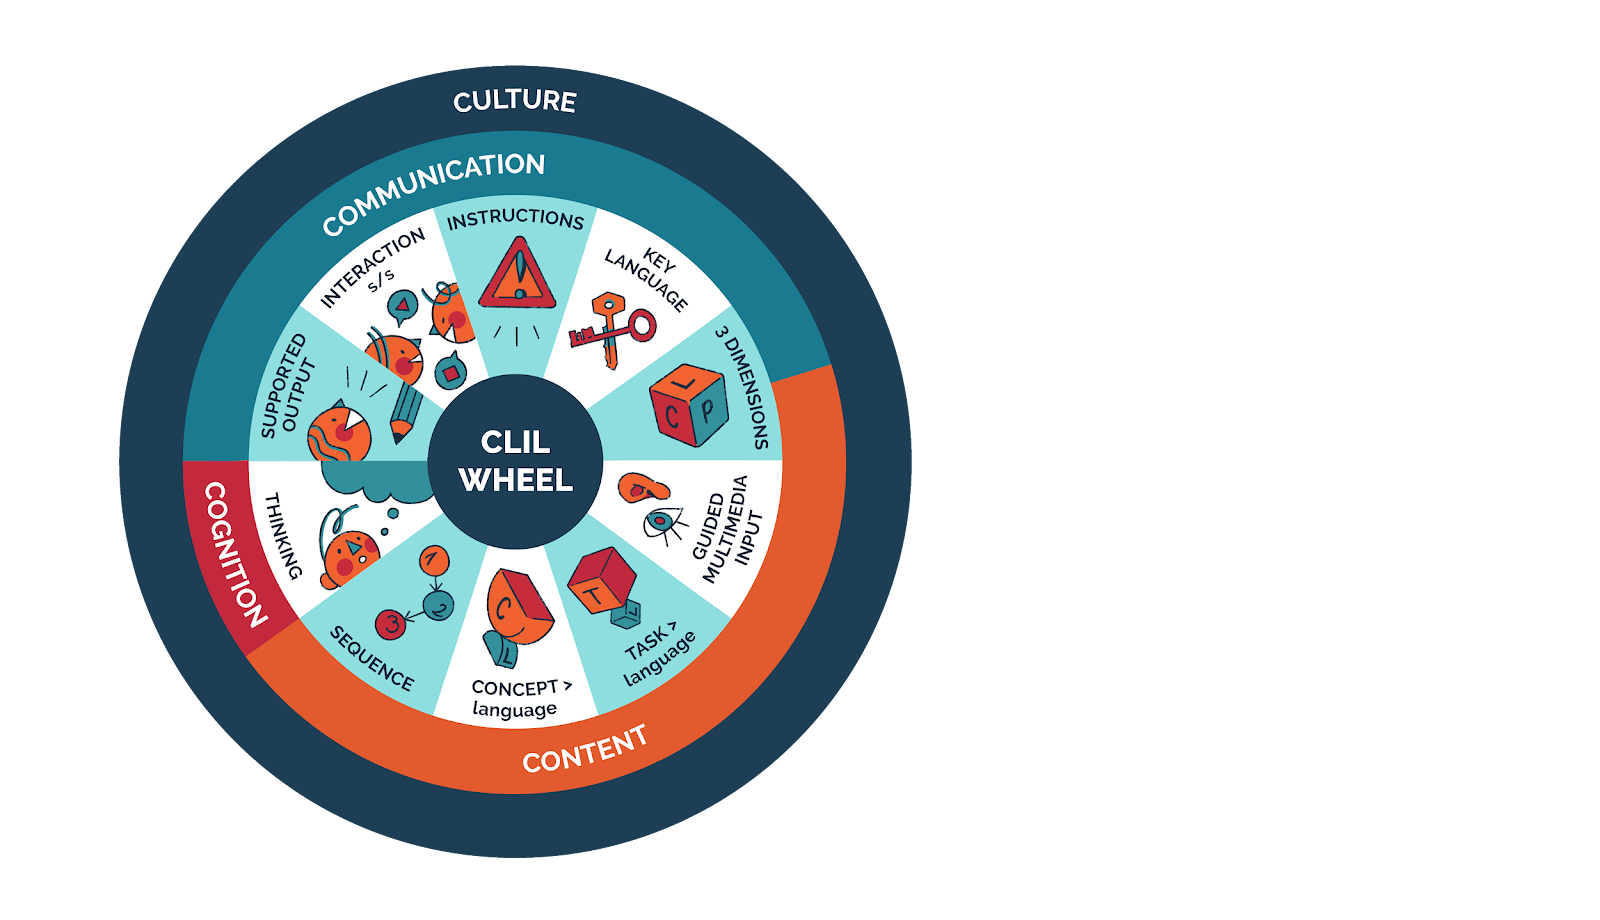
2) Concept > language (Conceptual fronting) The priority of CLIL is the content. As such, it will always dictate the language to be used. This will be true not only in terms of the vocabulary but also the language structures and functions. For instance, if we teach the water cycle, the vocabulary items will include ‘precipitation’, ‘evaporation’ and ‘condensation’. The major grammar structures are present tenses, while the language functions need to refer to a cycle, that is, terms like ‘first’, ‘next’ and ‘then’. |
|
3) Task > language (Task as priority, language as vehicle) The task dictates the language, as the language is not a goal but a vehicle for learning the content. For instance, if students need to research the progress of an invention over time and then communicate their findings, they will use specific time expressions, such as ‘first’, ‘then’, ‘ten years later’, ‘in the 19th century’, ‘in the early 20th century’, ‘in 1961’, ‘finally’, etc. They should also use past tenses and appropriate vocabulary. So, the language depends on the concept and the specific procedure we choose. |
|
4) Guided multimedia input (Guiding multimedia input) Input means all the information directed at the students. As such, it needs to be carefully designed and delivered. It also should be ‘chopped’ into smaller bits rather than delivered to students in large chunks. After every input instance, the teacher should stop and check understanding using appropriate concept-check questions before moving on. The word ‘multimedia’ clearly delivers the message - many, mainly visual, tools should accompany the content. Although modern classrooms often use multimedia, in a CLIL setting, it becomes even more critical. Mini-films with appropriate commentary would help students understand concepts better than a dry textbook description of the same process. Last but not least, this multimedia input should be guided. In this regard, teachers need to design pre-, while- and post-watching tasks to ensure that the students do not just sit idly watching a video but have support in the form of a handout to refer to. |
|
5) 3 dimensions (CLIL in three dimensions) Besides the content and the language, every CLIL lesson includes some procedures, that is, the technicalities of what needs to be done with the content using the language as a vehicle. Before the lesson, the teacher must decide which of those three elements, content, language or procedure, poses the most significant difficulty for the students. If this is the content itself, it needs special attention and support. In another instance, this might be the language needed to describe a process. The vocabulary thus would require extra work on pronunciation, spelling and meaning. The last element in this trio is a procedure. This may mean reading the text on similarities and differences, such as the Arctic and Antarctica, and transferring the information into a two-circle Venn diagram. The procedure might require extra time and careful explanation if the students have never seen or made such a graphic organiser. |
|
6) Key language (Making key language salient) Key language items need to be highlighted and made salient. Students can only discuss the studied concepts if they understand and can write and pronounce the necessary vocabulary. This language support means scaffolding (explicitly providing it) or embedding it into the text. Moreover, the language should be displayed in the classroom and provided as handouts. |
|
7) Careful! Instructions (The text-task relationship) The relationship between the text the students are to read, or the video they need to watch and the task they are to do is based on what lies in between, that is, instructions. To be effective, instructions should be carefully planned and staged to avoid adding to the burden of understanding the text/video and doing the task. In short, ensuring the students know what to do is crucial. A simple question: Do you know what to do? is not going to prevent problems. Some students find it challenging to acknowledge that they do not understand the task. Thus, the teacher should ask more detailed instruction-check questions, like: How many pieces of information do you need to find? or What are you going to do when you finish the task? |
|
8) Student-student interaction (Enhancing peer communication) A well-designed lesson should allow students to interact in pairs or groups. In CLIL, it is the time to check the understanding of the content and the correctness of the language the students need to express the studied concept. It is the time to rehearse the answer to the task before it can be given to the class. This postponed answer to the teacher’s question or the written task is essential. It can be achieved using various strategies, such as thinking routines (e.g. Think-Pair-Share) or information gap activities. Student-student interaction is also tightly connected to peer-to-peer learning. |
|
9) Supported output (Supporting student output) Besides guiding student input, CLIL teachers need to support student output. This ‘output’ is speaking and writing and may be preceded by other presentation forms, such as posters, models or graphs. By producing the language, students show themselves and their teachers that they are learning. Subject teachers should be aware that various output forms need different linguistic tools. Expressing an opinion differs from describing data, and expressing an opinion to a peer in pair work varies significantly from expressing an opinion through a PowerPoint presentation to the whole class. Similarly, in writing, a report on an experiment in science is different from writing an essay on Marxism. Thus, teachers must know the output-supporting strategies in relation to the specific requirements of their subject. For instance, writing can be supported through the use of writing frames. |
|
10) Thinking (Supporting thinking skills) The fact that the students learn non-linguistic content through a foreign language does not mean the teacher needs to simplify knowledge or spoon-feed the students. On the contrary, students must be challenged to ensure they grasp the concepts to be learnt. They need to be physically active and/or mentally involved in learning. As the world's complexity grows, students need various skills and competencies, such as problem-solving, intercultural awareness, creativity, and initiative. |
Fig. 2. Texts for reading activity (adapted from Ball et al., 2015)
|
Parameter |
Comments |
Parameter |
Comments |
|
|
|
||
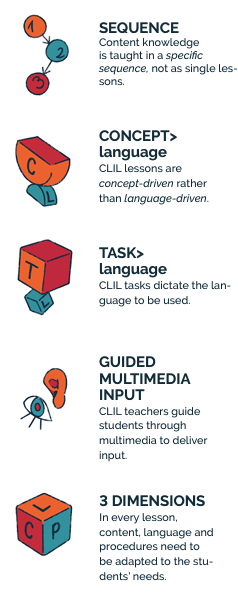
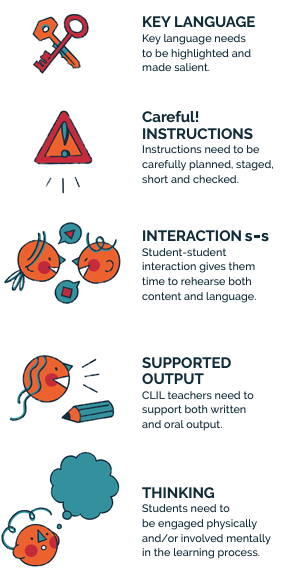
Fig. 3. Handout for note-taking in the follow-up stage (option 2)
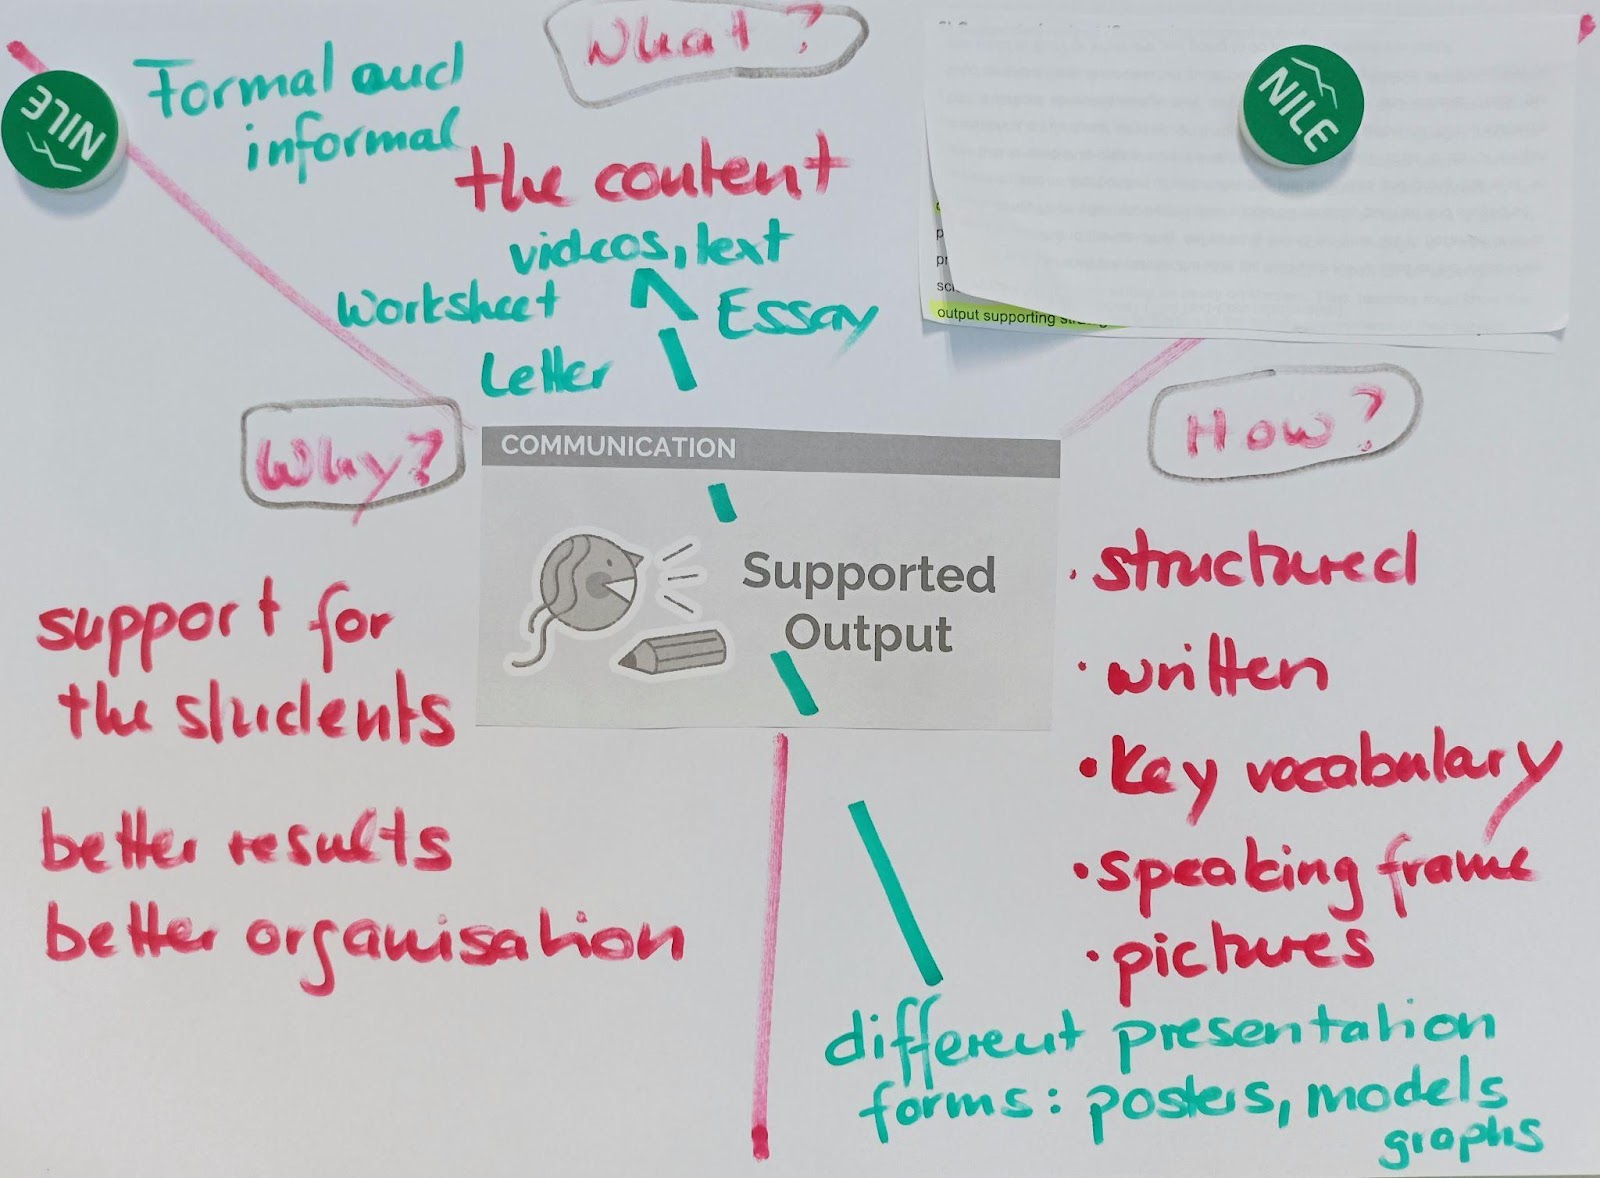
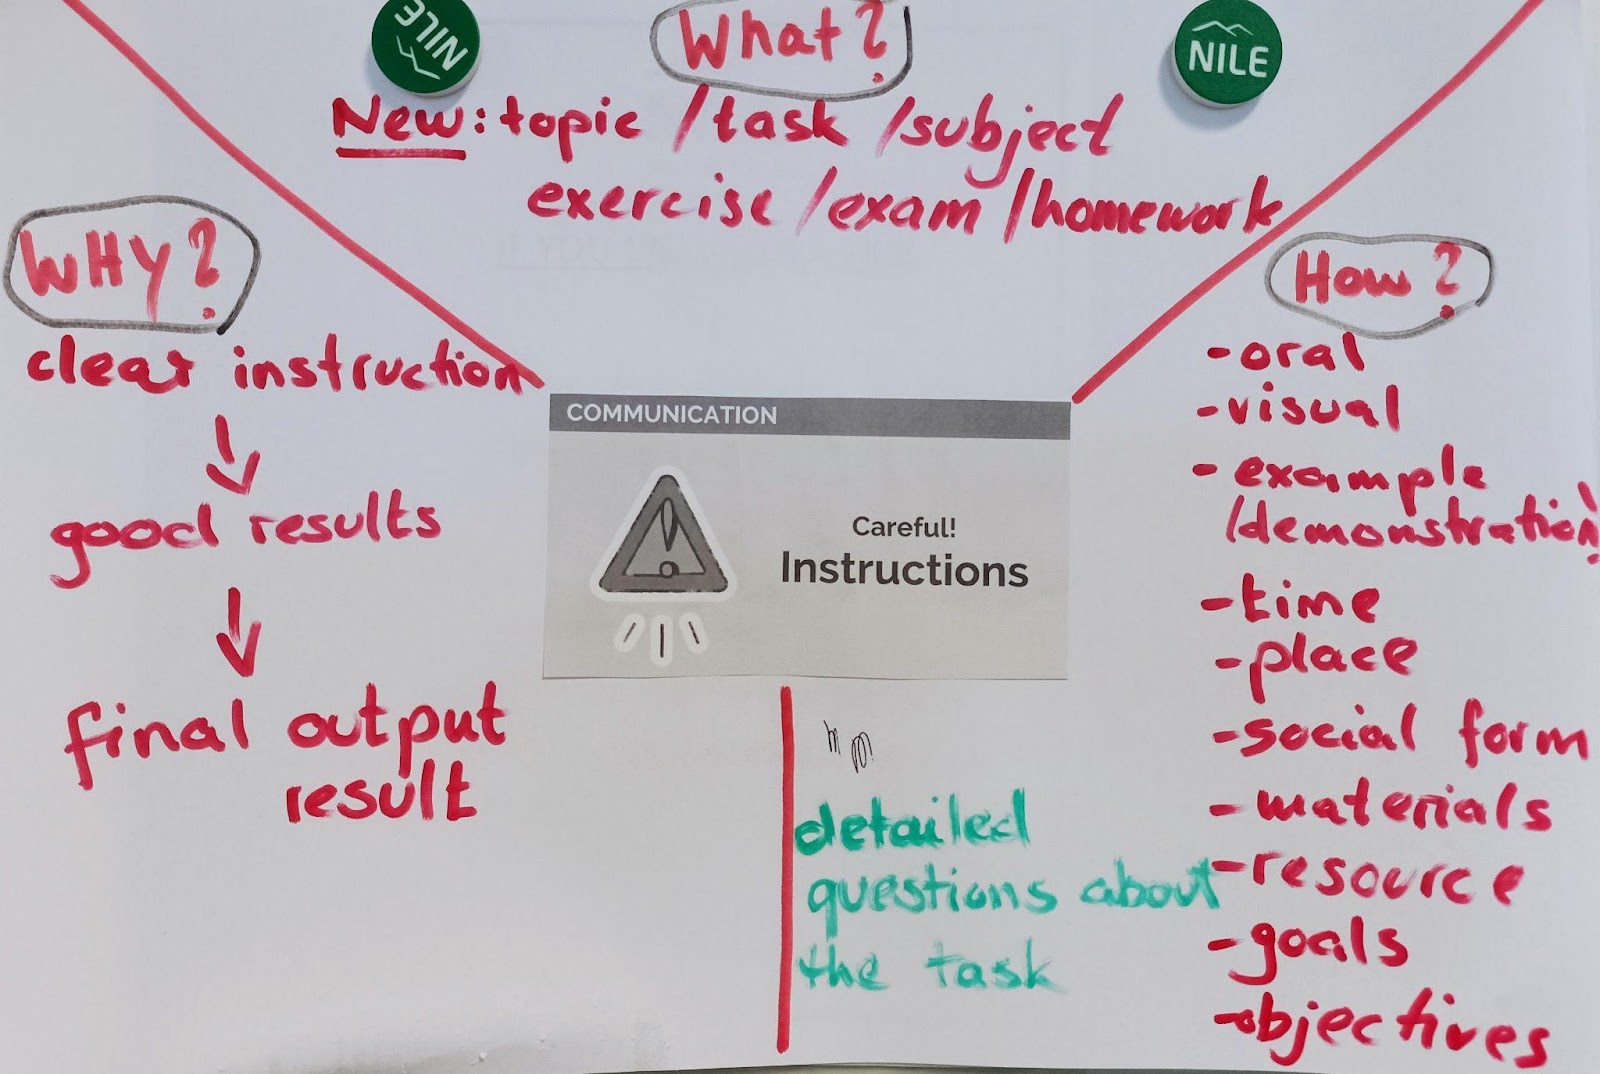
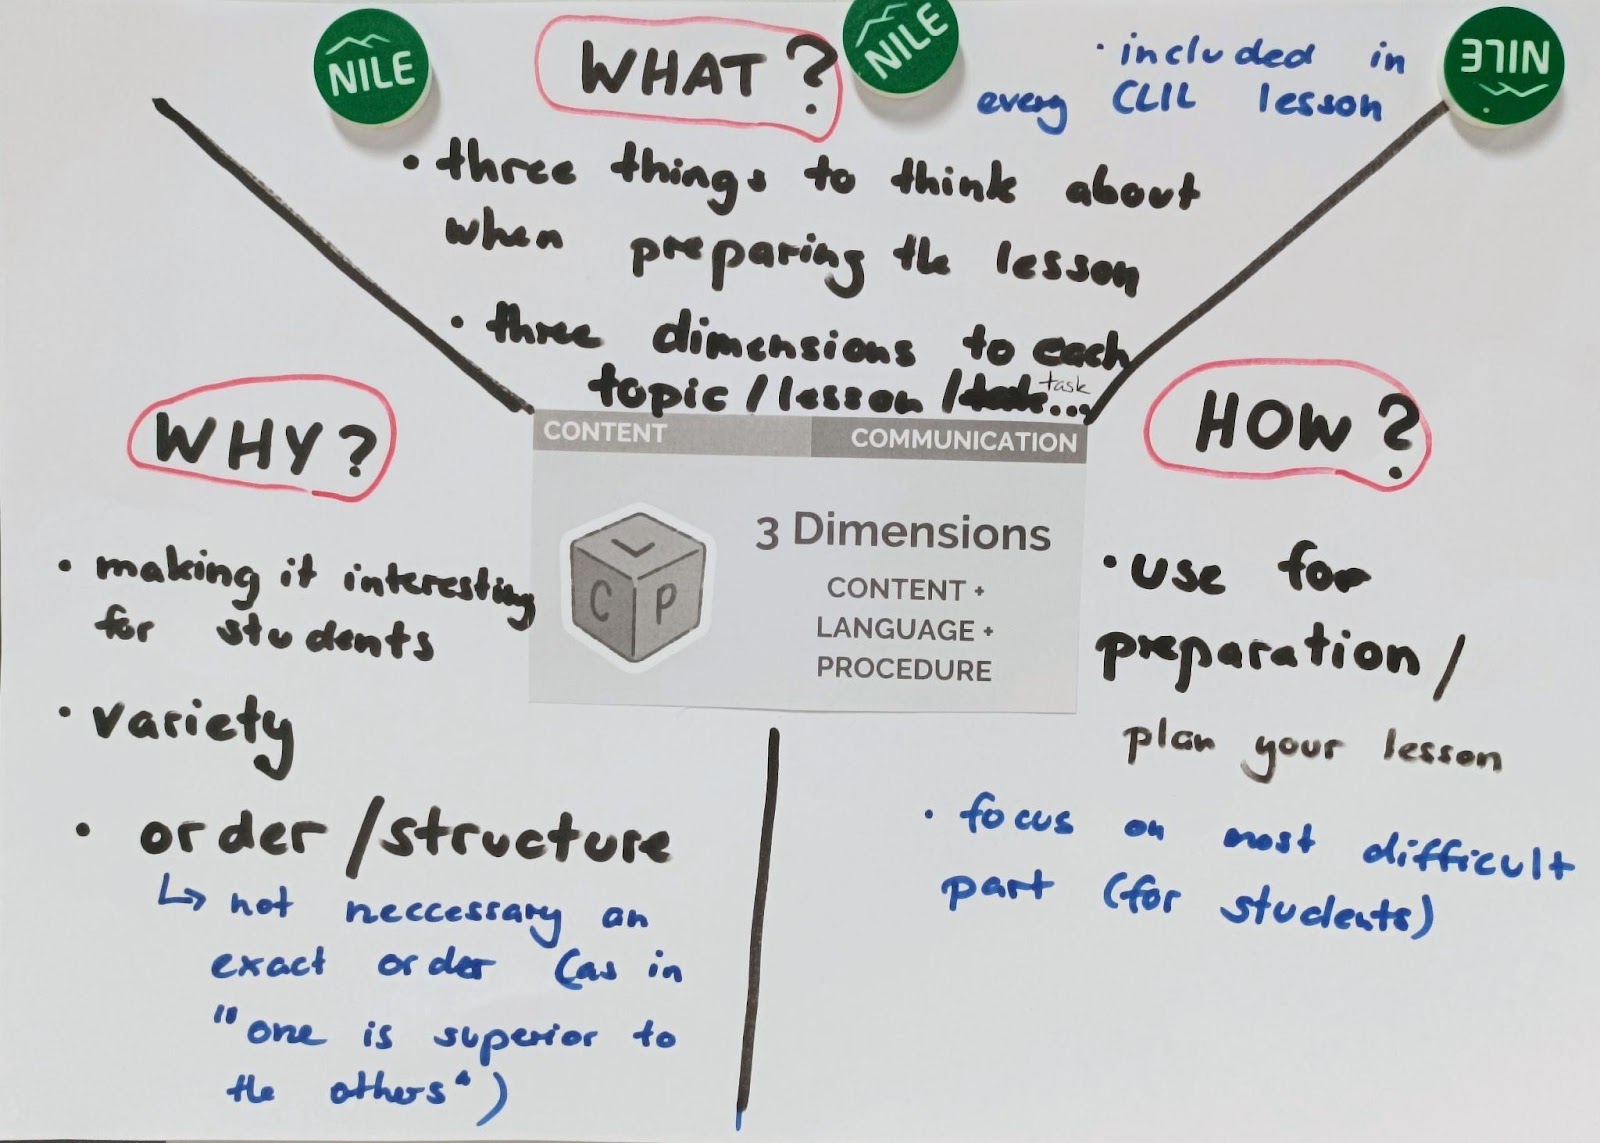
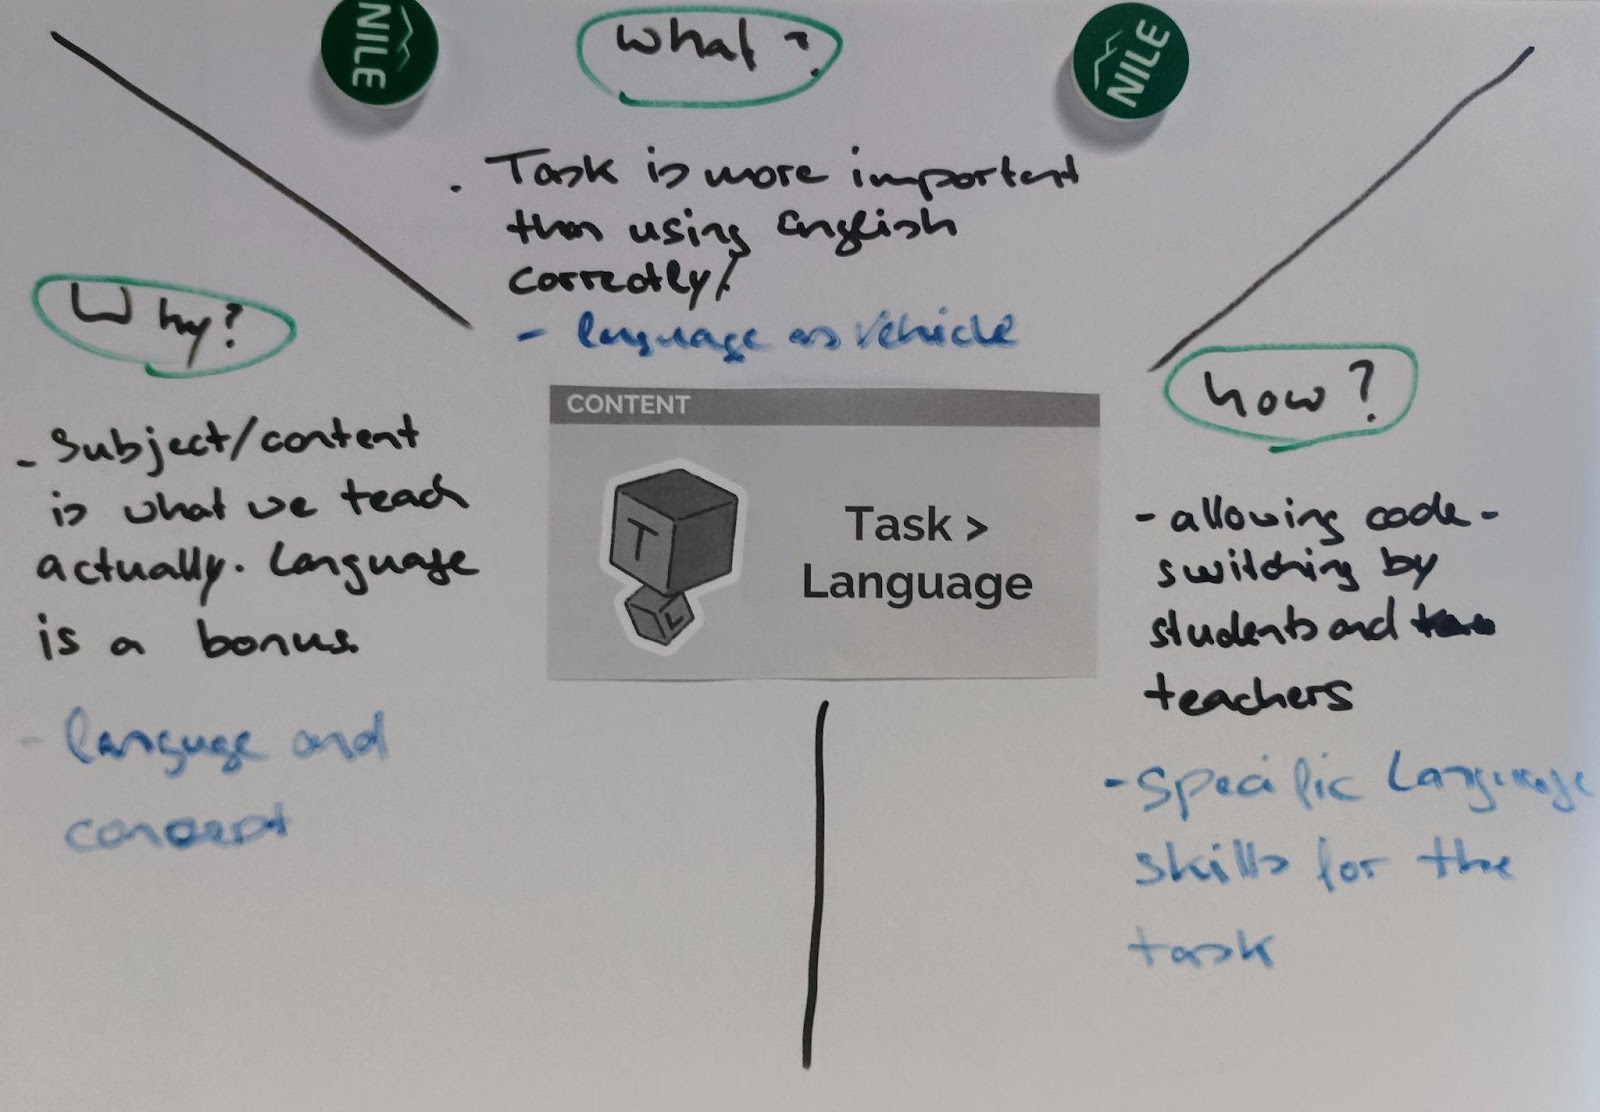
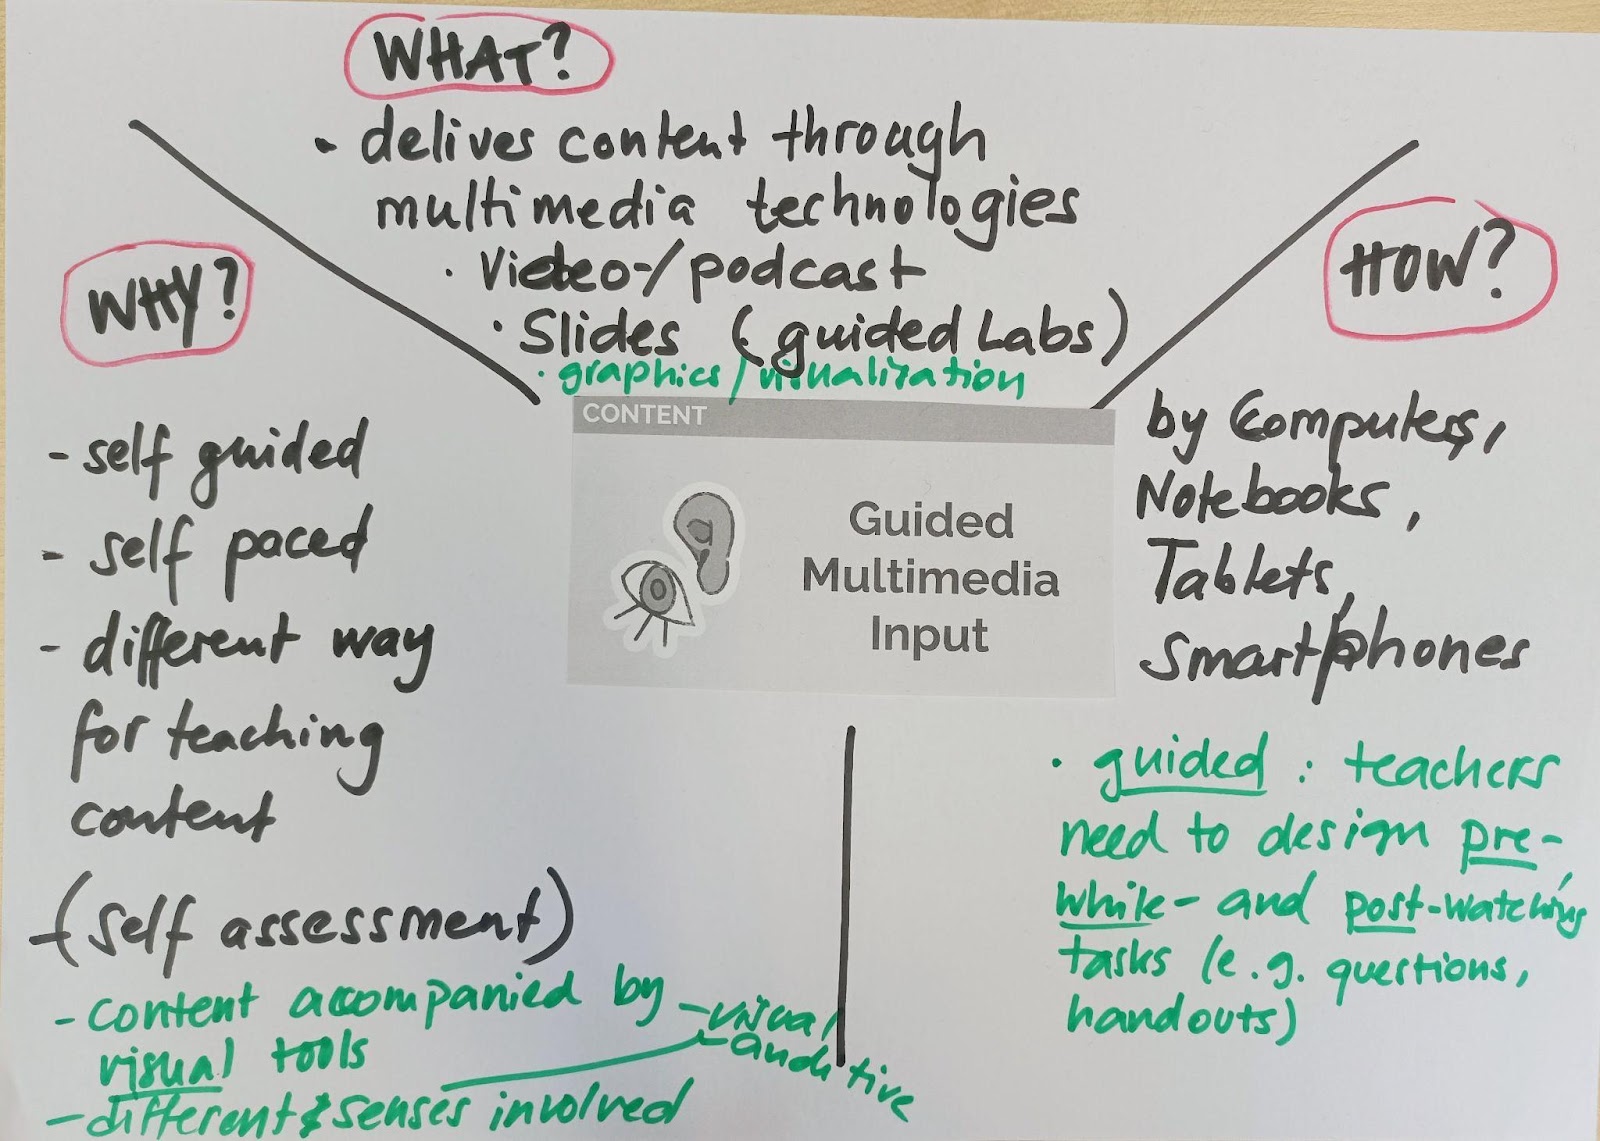
Fig. 4. Example posters produced during a teacher training session
Stage 3: Follow-up looping discussion
Whichever option is selected as the post-reading activity, the strategies involved in this session need to be reflected upon. The follow-up should include discussing group work as a strategy for dealing with a relatively large amount of content, stages of working with a text (pre-, while- and post-reading activities), and making mini-posters (negotiating the meaning of parameters’ icons and names, discussing the texts and negotiating what to add to the posters, etc.). Other interesting issues which may be addressed are visible learning through the use of two colours on the posters - before reading and after reading the texts (which may be extended to adding information at the end of the course if longer than a day), the use of mini-posters as support for speaking and the use of a handout as a writing frame. The participants may also discuss the benefits and challenges of teaching each other, including the reflection of ‘experts’ repeating the same content a few times and others taking notes while being taught by classmates and then reporting back to the group. Finally, the trainer should elicit some of the parameters visible in this sequence of tasks (such as guided multimedia input, student-student interaction, and supported output), and reflections on the language used during group discussions and teaching each other (instances of possible code-switching in monolingual groups of participants).
Stage 4: Summary
Of course, the training session, as presented above, is one of many options CLIL trainers can go for. More ideas besides the one described can be found at CLIL Wheel as a Teacher Training tool.
The CLIL Wheel video can also be used as a self-study session, followed by a face-to-face or online group discussion. The handout in Figure 5 can be used as a writing frame for video-related note-taking. Whatever option is used, the CLIL Wheel can greatly support trainers (and teachers) in pursuing CLIL-related tools.
|
The CLIL Wheel Worksheet |
|||||||||||||||||||||||||||||||||
Pre-reading |
|||||||||||||||||||||||||||||||||
Task 1Before you read the texts, note down your prior knowledge of the 4Cs of CLIL.
|
|||||||||||||||||||||||||||||||||
While-reading |
|||||||||||||||||||||||||||||||||
Task 1Skim your text to note down the position of the 4Cs of CLIL in the first stage of the CLIL Wheel construction. |
|||||||||||||||||||||||||||||||||
Task 2Now, order the 10 CLIL parameters as presented in the text. The first example has been done for you.
|
|||||||||||||||||||||||||||||||||
Task 3Read the text in detail to learn more about the CLIL Wheel. Use the sentence starters given below to complete the text.
|
|||||||||||||||||||||||||||||||||
Task 4read your text in detail to find more information about the CLIL parameters. In the table, write their names in the CLIL Wheel and add 3-5 words or expressions that you find most important for the given parameter.
|
|||||||||||||||||||||||||||||||||
Post-reading |
|||||||||||||||||||||||||||||||||
Task 1Note down your reflections on the CLIL Wheel as a concept. Use the sentence starters in the box. Make sure you explain your choice and write 3-4 sentences to every point.
|
|||||||||||||||||||||||||||||||||
Task 2Share your reflections with colleagues involved in CLIL. |

Fig. 5. The CLIL Wheel handout, which may accompany the video.
References
Ball, P., Kelly, K., & Clegg, J. (2015). Putting CLIL into Practice. Oxford University Press.
Coyle, D., Hood, P., & Marsh, D. (2010). Content and Language Integrated Learning. Cambridge University Press.
Zaparucha, A. (2019). The what, why and how of CLIL, Humanising Language Teaching, 21(1).
Please check the Pilgrims f2f courses at Pilgrims website.
Please check the Pilgrims online courses at Pilgrims website.
The Joys of Teaching English to 4- and 5-year-olds
Sanra Piai, UKSeven Failures in Pronunciation Teaching, and Seven Possible Solutions
Adrian Underhill, UKTwelve Top Approaches to Quality Teaching and Learning – Applying Inclusive Teaching and Learning in School Contexts
Phil Dexter, UKAn Inclusive Approach to Leadership for Teachers in ELT
Mercedes Pérez Berbain, PILGRIMS, ArgentinaCLIL Teacher Training: The Theories Underpinning CLIL
Aleksandra Zaparucha, PolandThe CLIL Wheel as a Teacher Training Tool
Aleksandra Zaparucha, PolandA Developmental Approach to Self-learning English at the Guantánamo University Language Center
Yanelis Jovellar Iznaga, Cuba;Silvia Miriam Morgan Scott, Cuba;Yamiriam Ruiz Boicet, CubaThe Building Blocks of a Teaching Philosophy: An ESL Teacher’s Retrospective
George Loetter, Japan